Nature Landscape Photography: Beaches, Iceland and New Zealand
If you want to shoot stunning scenery, nature landscape photography gives you the tools to turn raw light and terrain into images people stop to study. From rocky Atlantic shorelines to black-sand volcanic beaches, the world offers subjects you can capture with the right approach. This guide walks you through the key ideas behind beach landscape photography, curating a landscape photography gallery, and planning shoots in two of the planet’s most dramatic destinations.
You don’t need a decade of experience to get strong results. You need a plan, an understanding of light, and the patience to wait for conditions that do the heavy lifting for you. Whether you’re drawn to iceland landscape photography or new zealand landscape photography, the technical side is the same — only the scenery changes.
Reading Light and Timing Your Landscape Shots
Light is the single biggest variable in nature landscape photography. Shoot within the first 30 minutes after sunrise or the last 30 before sunset. At these times, the sun angle stays low, shadows stretch long across terrain, and warm tones saturate without blowing highlights.
For beach landscape photography specifically, watch the tide schedule. Wet sand at low tide acts like a mirror. Shoot facing the light source and you pick up sky reflections in the foreground automatically. Plan 90 minutes before the tide turns so you have time to set up, take test shots, and adjust composition before the water recedes.
Partly cloudy skies work in your favor. Clouds diffuse harsh midday light and add texture to otherwise flat skies. A polarizing filter cuts glare off water surfaces and can deepen blues by two full stops without adding a color cast.
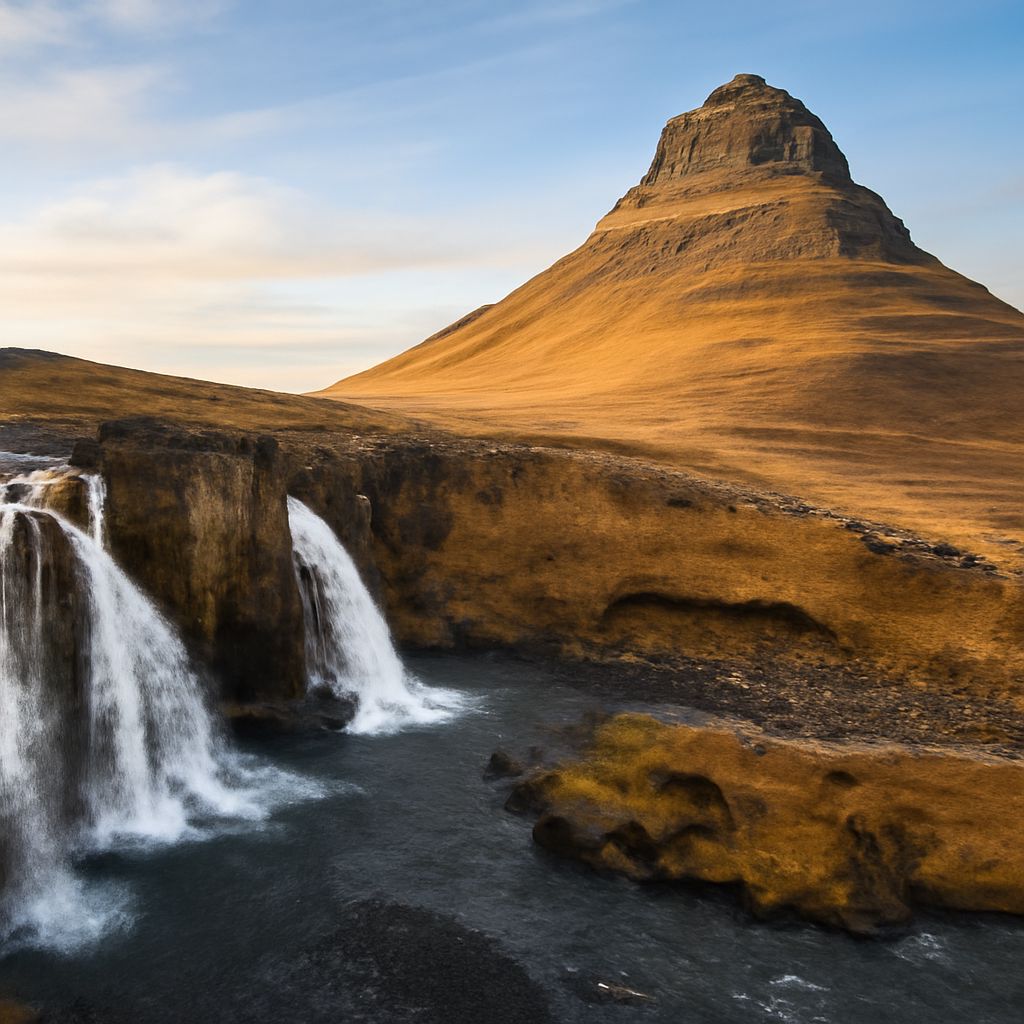
Iceland Landscape Photography: Field Conditions and Camera Settings
Iceland landscape photography demands preparation for fast-changing weather. Temperatures can drop 10°C in under an hour near coastal cliffs, and wind speeds above 20 m/s make tripod use essential. Use a ball head with a friction control knob tight enough that the camera holds position while you walk around to check the frame.
Shoot in RAW format and expose to the right of the histogram without clipping whites. Iceland’s basalt rock and volcanic ash are deeply dark, while waterfalls and glaciers reflect strongly. That dynamic range difference can exceed 10 stops in a single frame. Bracket three exposures — one stop under, correct, one stop over — and blend in post using luminosity masks.
Key locations include the south coast road between Vík and Jökulsárlón. Arrive at Skógafoss by 6:30 a.m. in summer. The morning mist hangs in the gorge for roughly 45 minutes before wind clears it, giving you a textured backdrop you won’t find at midday.
New Zealand Landscape Photography and Building Your Gallery
New zealand landscape photography spans three distinct zones — fiords, alpine peaks, and rolling coastal farmland — all within a compact island. The South Island’s Fiordland region shoots well from October through March when days run 15 hours. Mount Cook Village serves as a base for alpine work, with the Hooker Valley track putting you inside 4 km of a glacier lake with reflection shots.
When you return home, sorting images for a landscape photography gallery takes as much skill as shooting. Group by color palette first, not by location. Viewers read a cohesive gallery by tone — warm rusts and greens in one section, cool blues and grays in another. Limit each series to 12–15 images. Editing tightly makes every remaining frame carry more weight.
The best analog cameras for landscape work share one trait: they slow you down. A landscape photography gallery built on deliberate compositions shows in the final prints. Choose focal lengths between 24 mm and 50 mm for most work. Wider angles distort foreground elements; longer ones compress distant peaks cleanly.